
Essential Resources for Adult Colorists
The accessories and tools that may not take centre stage — but are genuinely critical to how well, how comfortably, and how enjoyably you color.

IN SUMMARY
- A
blender pencil — or baby oil and a cotton bud — transforms colour pencil results and works just as well on budget pencils as expensive ones. - Old eyeshadow palettes make gorgeous soft backgrounds for coloring pages. Don’t throw them out — repurpose them.
- A flexible LED desk lamp is one of the best investments for your coloring setup, especially for evening sessions when shadows matter.
- An electric pencil sharpener with auto-stop protects your investment in quality pencils by preventing tip breakage.
- A paper towel placed over finished gel pen areas while you work is the single most effective way to prevent accidental smearing.
- Once your finished pages start piling up — 100+ happens faster than you’d think — a binder with plastic sleeves or a quick photo for digital display solves the storage problem without needing more wall space.
- Additional accessories for hand pain, a sore neck or back, and similar discomfort are covered on my Adult Coloring Safety page.
Jump to a section:
Blending Resources
For those of you who like to blend your colour pencils, there are some invaluable resources you should have readily on hand. First is a

We earn commission if you make a purchase at no additional cost to you. See Disclosure Statement for further details....
If you don’t have access to a

We earn a commission if you make a purchase, at no additional cost to you.

We earn a commission if you make a purchase, at no additional cost to you.
💡 Pro Tip
The great thing about baby oil and Vaseline is that they work just as well on cheaper pencils as on the more expensive brands. Just make sure you use a dedicated jar or bottle for your coloring — not the ones from your medicine cabinet.
To best use petroleum jelly or baby oil as a blending medium, you’ll need something to apply it with. The best applicator I’ve found is the humble cotton bud — also known as Q-tips or cotton swabs. A cotton bud gives you the flexibility to apply just the right amount of your chosen medium while also giving you good control for getting into detailed spaces. I especially like ones with a pointed tip, as they make it easy to get into super detailed parts of your coloring pictures.

We earn a commission if you make a purchase, at no additional cost to you.
Applying Backgrounds
Ever wanted to add a soft background to one of your coloring pictures? Don’t have any chalk or soft pastels? Don’t worry — you can raid your makeup supplies! Did you know you can use eyeshadow as an alternative to chalk pastels?
If you’re anything like me you may have a bunch of old eyeshadow palettes that you no longer use — the ones with really bright colours from the 80s that just sit in a drawer. Now you don’t need to throw them away. Instead, add them to your coloring supplies. I find palettes with a lot of bright, highly pigmented colours work best, as they appear much softer once placed on paper.

We earn a commission if you make a purchase, at no additional cost to you.
💡 Pro Tip
It’s easy to apply eyeshadow backgrounds using cotton balls or cotton pads. Just rub against the eyeshadow colour you want, then apply to the paper in a rubbing or circular motion. You’ll be creating gorgeous soft backgrounds in no time. For more information on how, check out my article on Background Techniques.

We earn a commission if you make a purchase, at no additional cost to you.

We earn a commission if you make a purchase, at no additional cost to you. See Disclosure Statement.
Making it Easy to See
A good quality light source is a necessity for adult coloring, especially at night, but even during the day if you want to prevent shadowing across your work. The older I get, the more I find I need heaps of light to see the details in my coloring pictures clearly.
Desk Lamp
One of the best investments I made for my coloring desk was an inexpensive portable battery-operated USB Charging LED desk lamp with a flexible stalk. The LED lamp has three light settings and the flexible stalk allows me to position it in many different spots. This ensures I can clearly see the area I’m coloring.

We earn a commission if you make a purchase, at no additional cost to you.
Magnifying Glass
Another option for improving your ability to see very small details is a flexible stalk magnifying glass with a built-in light. It can be used with or without the light but will greatly improve your ability to get into those tiny, detailed areas without coloring over the lines.

We earn commission if you make a purchase at no additional cost to you. See Disclosure Statement for further details....
Reading Glasses
For those who just want that bit of extra clarity and may not need a lamp or magnifying glass, a pair of reading glasses might be the answer. Comfortable to wear and fashionable, they’re a convenient tool to pop in your coloring supplies stash — especially handy when you color on the go, such as in a doctor’s waiting room or in the car during school pickup.
Kerecsen make some great pairs of reading glasses — they come in many fashionable frame colours and a multitude of magnification strengths, and are available in packs of 5 making them ultra convenient to have in multiple spots where you like to color.

We earn commission if you make a purchase at no additional cost to you. See Disclosure Statement for further details....
Essential Tools for Color Pencil Users
Colour pencils are forgiving to learn but a little fussy to maintain — the right sharpener, an extender for the stubs you don’t want to waste, and a good eraser will keep you coloring longer and spending less on replacement pencils.
Sharpeners
If you love using colour pencils then one of the critical resources you’ll need to keep your pencils sharp and always “on point” is a sharpener. There are two paths here: a manual sharpener or an electric one. My favourite manual option is the T’GAAL Angle Adjustable Pencil Sharpener (see the full T’GAAL sharpener review) — compact, no batteries needed, and it lets me dial in the exact point angle I want. For everyday desk use I reach for an AFMAT Electric Pencil Sharpener instead: it auto-stops the moment the point is ready, so I never grind away pencil I didn’t need to lose. I’ve tried these with all types and brands of coloured pencils — from high-end professional grade like Faber-Castell Polychromos and Prismacolor, to more economical options like Crayola and no-name Dollar Store brands. Both work well across the board. Benefits of both include:
- Fit different thicknesses of colour pencils
- Allow you to sharpen pencils to different point options
- Have a built-in receptacle for catching shavings
- Easy to use and give consistently good results
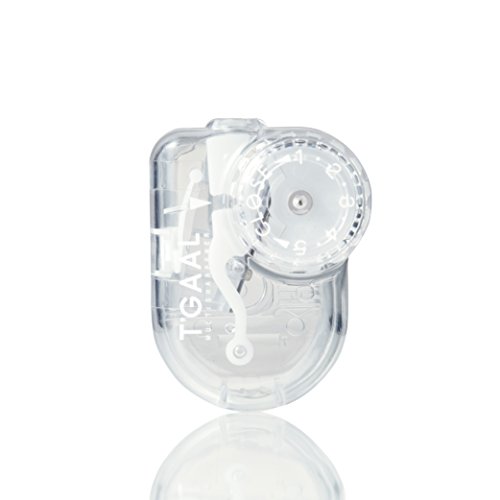
We earn a commission if you make a purchase, at no additional cost to you.

We earn commission if you make a purchase at no additional cost to you. See Disclosure Statement for further details....
💡 Pro Tip
Keep a small, soft brush next to your sharpener — an inexpensive makeup or drafting brush works fine. A quick sweep clears shavings and pencil dust off your page before you keep coloring, instead of blowing on it and scattering pigment dust everywhere.
Pencil Extenders
Every colour pencil eventually gets too short to hold comfortably — and it always seems to happen to my favourite colours first. Rather than tossing a perfectly good stub in the bin, a pencil extender clamps around the short end and gives you back a full-length, comfortable grip.
They’re inexpensive, they fit almost any brand — Prismacolor, Faber-Castell, Crayola, Derwent, I’ve never had one that didn’t work — and they genuinely stretch your pencil budget further. If you’ve invested in a good set of colour pencils, an extender is one of the cheapest ways to get full value out of every last one before it goes in the bin.

We earn commission if you make a purchase at no additional cost to you. See Disclosure Statement for further details....
Erasers — Not Just for Mistakes
Sometimes mistakes happen when you’re coloring. Maybe you accidentally colour outside a line, or your four-legged coloring buddy (your cat or dog) brushes past you and knocks a pencil onto your page. When these things happen, an eraser can be a godsend.
💡 Creative Use
Don’t limit yourself to thinking that erasers are only useful for removing mistakes. An eraser can be a helpful tool when adding (or more accurately, removing) creative touches to your pictures. Say you want to create an interesting background — lay down a wash of colour with a pencil or chalk pastel, then use an eraser to create interesting patterns: a broken effect, a self-stripe, or a dot pattern. The possibilities are only limited by your imagination.
I like to use a plastic eraser such as the Staedtler Plastic Vinyl Eraser. For more challenging pencil mistakes where I want a very clean and accurate removal, I prefer a Kneaded Rubber eraser such as the one made by Prismacolor. The kneaded eraser can be easily shaped and moulded to cleanly remove colour pencil, pastels, chalks, and charcoal markings.

We earn a commission if you make a purchase, at no additional cost to you.

We earn a commission if you make a purchase, at no additional cost to you.
For picking out a fine highlight or correcting one small, precise spot without disturbing the colour around it, an electric eraser is worth considering too — the spinning tip lifts colour cleanly in tight areas that a hand-held eraser tends to smudge. I don’t reach for mine often, but when I need it, nothing else does the job as neatly.
Essential Tools for Gel Pen Users
Gel pens are one of my favorite coloring media. They glide smoothly and quickly over the paper and they have a beautiful rich, sparkly, metallic, and bright array of colours. But they are a wet medium, which means your work can be prone to smearing until the gel ink dries.
Preventing Smears: Paper Towels
If you’ve ever made that sickening mistake when you’ve almost finished your gel pen coloring and accidentally rubbed your hand across an area that wasn’t quite dry — you’ll appreciate this next tip.
💡 Pro Tip
By carefully placing a piece of paper towel over the parts of your gel pen coloring that you’ve already completed, you can prevent your hand from smearing the still-wet gel while you colour an adjacent area. This has been a lifesaving tip for me. Paper towels are also great for cleaning up the tip of your gel pens when they get clogged with glitter or dry gel.

We earn a commission if you make a purchase, at no additional cost to you.
Fixing Skipping and Clogged Gel Pens
Anyone who frequently uses gel pens will be able to relate to the issue of pens occasionally skipping or the ink clogging in the nib. Here are the three methods I’ve found most effective:
Shake Vigorously
Shake the pen up and down firmly to help get rid of any air bubbles that may have formed within the gel ink. This often gets the ink flowing again quickly.
Tap on a Sticky Note Block
Firmly tap the nib of your gel pen onto a thick block of sticky notes — anywhere from a quarter-inch or more thick. The tapping allows any glitter or minute debris on the roller ball to come free. The thickness of the block cushions without breaking the nib. It may take a few firm taps before the ink starts flowing smoothly again.
Rubbing Alcohol Dip
If tapping on sticky notes doesn’t free up your pen (and it’s not out of ink), try rubbing alcohol. Dip the nib in rubbing alcohol for a few seconds, wipe off with a damp paper towel, then scribble on a spare piece of paper. Your gel ink pen should be flowing again.

We earn a commission if you make a purchase, at no additional cost to you.

We earn a commission if you make a purchase, at no additional cost to you.
Organisers
A good organiser does more than tidy your desk — it keeps your pencils sharp longer, your markers capped so they don’t dry out, and keeps the pens you’re currently using close at hand.
- A cloth pencil roll keeps your set visible and travels well. Rolled flat with each pencil in its own slot, you can see your whole range at a glance and it takes up almost no drawer or bag space — a genuinely different option from a rigid zip case if you like to colour away from your desk.

We earn commission if you make a purchase at no additional cost to you. See Disclosure Statement for further details....
- A wooden desktop caddy is the cheapest fix for a cluttered desk. No batteries, no assembly — just a stand-alone holder that keeps your most-used pencils and pens upright and within reach instead of rolling off the table.

We earn commission if you make a purchase at no additional cost to you. See Disclosure Statement for further details....
- Stackable marker trays solve the “my collection outgrew its case” problem. Once you’ve got more markers or gel pens than a single pouch can hold, trays that click together vertically or horizontally let your storage grow with your collection instead of forcing you into a second loose pile.

We earn commission if you make a purchase at no additional cost to you. See Disclosure Statement for further details....
- A compartmentalised tote makes your hobby portable. Pack the coloring book you’re working on plus the pencils and tools it needs into one bag and you’re ready to colour at the coffee shop, the beach, or wherever the day takes you — no hunting through separate places for the two halves of the same session before you head out the door.

We earn commission if you make a purchase at no additional cost to you. See Disclosure Statement for further details....
💡 Pro Tip
Whichever system you choose, keep it within arm’s reach of where you actually colour. The best organiser in the world doesn’t help if it lives in a cupboard across the room — you’ll just go back to piling everything on the desk.
Finished Coloring Pages
Here’s something nobody warns you about when you start adult coloring: the finished pages pile up fast. What begins as a handful of favourites on the fridge can turn into a hundred-plus completed pages within a year or two — and your walls run out of room long before your enthusiasm does. A few simple accessories make it easy to protect, display, and actually enjoy the work you’ve put your time into, instead of it disappearing into a drawer.
Protecting Your Work
Before you frame, gift, or even just store a finished page, a light coat of fixative spray (sometimes labelled a workable fixative or sealer) stops colour pencil pigment from smudging, transferring, or fading over time. This matters more than it sounds — I’ve had older pages pick up smears just from sitting face-to-face with another page in a folder. One or two light passes, held at a distance and left to dry flat, is all it takes. My go-to is Krylon Artist Spray — one 11oz can lasts through dozens of pages and dries clear without a strong smell lingering in the house.

We earn commission if you make a purchase at no additional cost to you. See Disclosure Statement for further details....
💡 Pro Tip
Spray fixative outdoors or in a well-ventilated space, and always do a test pass on a scrap page first — some sprays slightly darken metallics or shift softer colours.
Framing Favourites
Most coloring book pages are a standard size — usually around 8.5 x 11 inches, or A4 if your book was printed for the UK or Australian market — which makes framing easier than you’d expect once you know what to look for. An 8×10 or 9×12 frame with a mat will comfortably fit a book page without any trimming, and the mat hides any slight size mismatch. For an oversized coloring poster, check the exact dimensions before you buy a frame, since those don’t follow the standard book-page size.
If you’d rather not hunt one down yourself, this Amazon Basics 8×10 frame, sold as a 2-pack with a 5×7 mat, is an easy, affordable starting point — pop the mat out for a near-full-page display, or keep it in to frame just your favourite detail from the page.

We earn commission if you make a purchase at no additional cost to you. See Disclosure Statement for further details....
Binders & Page Protectors
Framing is lovely for the two or three pages you’re proudest of, but it was never going to work for all of them — and once you’re past a hundred finished pages, it doesn’t need to. This is where a binder with clear plastic page-protector sleeves earns its keep. Slide each finished page into its own sleeve and you’ve got a growing, protected portfolio you can flip through anytime, with no pin holes and no folds. It’s also the easiest way I’ve found to keep pages organised by book or by colour palette, if that’s something you like to track.
If you want something ready-made, the Itoya Original Art ProFolio (9×12, 48 pages) is a genuinely nice one — acid-free sleeves built for exactly this kind of thing. On a budget, Amazon Basics Heavy Duty Sheet Protectors (100-pack) work in any standard binder you’ve already got, at a fraction of the price.

We earn commission if you make a purchase at no additional cost to you. See Disclosure Statement for further details....
Going Digital
Not every finished page needs a physical home. A quick scan, or even just a well-lit photo on your phone, means you can display your favourites on a digital photo frame, a tablet propped on a shelf, or whatever smart display you’ve already got in the house — ours cycles through finished pages the same way it cycles through family photos. It costs nothing, there’s no wall space involved, and you can rotate favourites in and out whenever the mood takes you. If you don’t already have something suitable, the Frameo 10.1″ WiFi Digital Photo Frame is a straightforward, well-reviewed option — upload photos from your phone and it updates over WiFi, no cables involved.

We earn commission if you make a purchase at no additional cost to you. See Disclosure Statement for further details....